Using Metaport
Metaport is a Javascript/Typescript customizable IMA bridge widget embeddable into any web application. It enables SKALE network developers an easy way to guide users through executing IMA bridge transactions throughout the SKALE Network and with Ethereum.
Use Cases and Highlights
-
Guide users through transferring ERC-20 tokens between your dApp and a dApp on another SKALE chain.
-
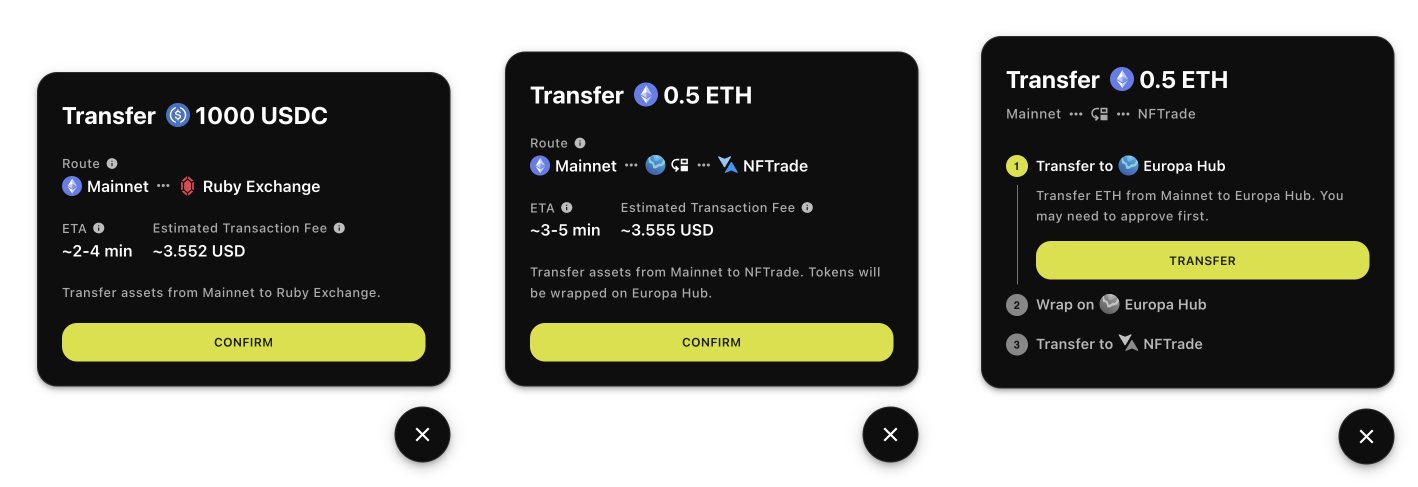
Guide users through multi-step wraps and transfers between Ethereum, the Europa liquidity Hub, and the Calypso NFT Hub.
-
Allow users to bridge tokens from your game on the Nebula Gaming Hub to the Ruby Exchange DEX on Europa Hub.
-
Help users quickly unwrap stuck tokens on various chains.
Feature highlights:
-
Flexible: guide users through SKALE Chain to SKALE Chain transfers, wrap and unwrap transactions, and deposits and exits with Ethereum.
-
Event-driven: provide application updates for users who have completed specific bridge actions.
-
Customizable UI: modify the color scheme of Metaport with a theme to match your brand.
| To test out a playground environment, check out https://skale-metaport-demo-cra.vercel.app/ |
Getting Started
-
Install
$ npm install --save @skalenetwork/[email protected]$ yarn add @skalenetwork/[email protected]If using Next.js or other SSR projects, see Implementation in SSR below. -
Implementation
You can import Metaport into any modern web application (Vue/React/Angular/etc).
Add empty div with
metaportid in the root page of your application:<div id='metaport'></div>Import Metaport library and init the object:
import { Metaport } from '@skalenetwork/metaport'; const metaport = new Metaport(METAPORT_OPTIONS); -
Configure Metaport Options
-
You can skip almost all initialization options and set available tokens, chains and theme after Metaport initialization.
-
When possible, use bridge configurations below. Otherwise, pay close attention to the tokenKeyname and be sure to match it closely across chains.
-
For custom bridge configurations, see Example Metaport Options section below.
-
For applying already used bridge configurations, use the following network configs:
-
Implementation in SSR
Metaport has browser-only build. To use it in an application that uses server-side rendering you need to adapt it using trick described here.
Here is an example of Metaport import & usage in Next.js app with SSR:
// in react component

const [metaport, setMetaport] = React.useState();

async function loadMetaport() {
    const Metaport = (await import('@skalenetwork/metaport')).Metaport;
    setMetaport(new Metaport({
      openOnLoad: true,
      skaleNetwork: 'staging',
      chains: ['mainnet', 'chainName1'],
      tokens: {'mainnet': {'eth': {}}}
    }));
}

useEffect(() => {
    loadMetaport();
}, []);

useEffect(() => {
    if (metaport) {
      console.log('metaport widget initialized');
    }
}, [metaport]);
Example Metaport Options
const metaport = new Metaport({
    openOnLoad: true, // Open Metaport on load (optional, default = false)
    openButton: false, // Show open/close action button (optional, default = true)
    autoLookup: false, // Automatic token lookup for M2S tokens (default = true)
    mainnetEndpoint: MAINNET_ENDPOINT, // Ethereum Mainnet endpoint, required only for M2S or S2M transfers (optional, default = null)
    skaleNetwork: 'staging3', // SKALE network that will be used - mainnet, staging, or staging3 (optional, default = mainnet)
    debug: false, // Enable debug mode (optional, default = false)
    chains: [ // List of SKALE Chains that will be available in the Metaport UI (default = [])
        'chainName1',
        'chainName2',
        'chainName3'
    ],
    chainsMetadata: { // Chain name aliases that will be displayed in the UI (optional, default = {})
        'chainName1': {
            alias: 'Europa SKALE Chain', // optional
            minSfuelWei: '27000000000000', // optional
            faucetUrl: '[FAUCET_URL]' // optional
        },
        ...
    },
    tokens: { // List of tokens that will be available in the Metaport UI (default = {})
        'chainName2': { // chain name where token origin deployed (mainnet or SKALE Chain name)
            'erc20': { // token type (erc20 and eth are supported)
                '_[TOKEN_SYMBOL]_[TOKEN_ORIGIN_ADDRESS]': { // token keyname (composed from token symbol and origin token address)
                    'name': 'TOKEN_NAME1', // token display name
                    'address': '0x0357', // token origin address
                    'symbol': '[TOKEN_SYMBOL]' // token symbol
                    'cloneSymbol': 'CTST' // optional, symbol of the clone token
                    'iconUrl': 'https://example.com/my_token_icon.png', // optional
                    'decimals': '6' // optional (default = '18')
                }
            }
        }
    },
    theme: { // custom widget theme (default = dark SKALE theme)
        primary: '#00d4ff', // primary accent color for action buttons
        background: '#0a2540', // background color
        mode: 'dark' // theme type - dark or light
    }
});Functions
Transfer
When sending a transfer request you can specify token and chains or keep ones that are already selected in the Metaport UI.
import { interfaces, dataclasses } from '@skalenetwork/metaport';

// token keyname is composed from token symbol and origin token address
const tokenKeyname = `_${tokenSymbol}_${tokenAddress}`;

const params: interfaces.TransferParams = {
    tokenId: tokenId, // for erc721, erc721meta and erc1155 tokens
    amount: amount, // amount to transfer (in wei) - for eth, erc20 and erc1155 tokens
    chains: chains, // 'from' and 'to' chains (must be present in the list on chains)
    tokenKeyname: tokenKeyname, // token that you want to transfer
    tokenType: dataclasses.TokenType.erc1155, // available TokenTypes are eth, erc20, erc721, erc721meta and erc1155
    lockValue: true, // optional, boolean - lock the amount in the Metaport UI
    text: 'Transfer text', // optional, string - text that will be displayed in the Metaport UI
    route: { // optional, interfaces.RouteParams - only for transfers with routing
        hub: 'hub', // string - name of the hub chain
        tokenKeyname: tokenKeyname, // token keyname on the hub chain
        tokenType: dataclasses.TokenType.erc1155 // token type on the hub chain
    },
    fromApp: 'ruby', // optional, string - name of the application on the source chain
    toApp: 'nftrade', // optional, string - name of the application on the destination chain
};
props.metaport.transfer(params);
Once transfer request will be fully processed, you will receive metaport_transferRequestCompleted event (see Events section for more details).
On each transfer completion will be completed, you will receive metaport_transferComplete event (see Events section for more details).
When using transfer back to back, the UI might hang. You can use reset to clear Metaport. This should be ideally be done at the start of every transfer.
|
Events
You can receive data from the Metaport widget using in-browser events.
Here is an example that demonstrates how you can subscribe to events in your dApp:
window.addEventListener(
    "metaport_transferComplete",
    transferComplete,
    false
);

function transferComplete(e) {
    console.log('received transfer complete event, transaction hash: ' + e.details.tx);
}
transferComplete
metaport_transferComplete: {tokenSymbol, from, to, tx} - emitted when a single transfer is completed and funds are minted on destination chain
transferRequestCompleted
metaport_transferRequestCompleted: {interfaces.transferRequest} - emitted when the transfer request is completed and funds are minted on destination chain
unwrapComplete
metaport_unwrapComplete: {tokenSymbol, chain, tx} - emitted when unwrap transaction is mined
Tips & tricks
SKALE Network Options
| Default is Mainnet. |
By default, Metaport is linked to the Ethereum Mainnet, however, Metaport can also be configured to work with the Ethereum Goerli Testnet (SKALE Staging). The valid options for skaleNetwork are:
| Network Name | Config Value | Active | Default |
|---|---|---|---|
Ethereum |
mainnet |
Yes |
Yes |
Goerli |
staging3 |
Yes |
No |
Rinkeby |
staging |
No |
No |
const metaport = new Metaport({
  ...
  skaleNetwork: "staging3" // or "mainnet"
  ...
})
Automatic M2S token lookup
| Only for tokens with origin on Mainnet |
By default, automatic token lookup is enabled for Mainnet to SKALE Chain transfers. You can disable
it by setting autoLookup value to false. Also, you can override info retrieved by the automatic
lookup by adding token to the tokens list in the following way: _[TOKEN_SYMBOL]_[TOKEN_ADDRESS]:
const TOKENS_OVERRIDE = {
  'mainnet': {
    'erc20': {
      "_TST_0x123456": {
        "name": "MY TEST TOKEN",
        "iconUrl": "https://example.com/test.png",
        "decimals": "6"
      }
    }
  }
};

const metaport = new Metaport({
    ...
    autoLookup: true,
    tokens: TOKENS_OVERRIDE
    ...
})
Locking a token
If you are passing multiple tokens to Metaport constructor or to updateParams function they will be available in the dropdown menu and no token will be selected by default.
If you want to lock user on a specific token, pass a single entry to tokens param:
const metaport = new Metaport({
    ...,
    tokens: {
        'chainName2': {
            'erc20': {
                '_TST_0x123456': {
                    'name': 'TEST_TOKEN',
                    'address': '0x0357'
                }
            }
        }
    }
})
Same works for updateParams function:
metaport.updateParams({tokens: {
    'chainName2': {
        'erc20': {
            '_TST_0x123456': {
                'name': 'TEST_TOKEN',
                'address': '0x0357'
            }
        }
    }}});
Now token tst will be pre-selected and locked in the Metaport UI.
Locking chains
If you are passing more that 2 chains to Metaport constructor or to updateParams function they will be available in the dropdown menu and no chain will be selected by default.
If you want to perform/request transfer from one particular chain to another, pass exactly 2 chain names to schain param:
const metaport = new Metaport({
    ...,
    chains: [
        'chainName1', // this one will be set as 'From' chain
        'chainName2' // this one will be set as 'To' chain
    ],
})
You can use the same approach for updateParams and transfer functions.
Adding Mainnet & ETH
ETH clone is already pre-deployed on each chain. You can enable it for any chain by adding the following config:
const metaport = new Metaport({
    ...,
    chains: ['mainnet', 'chainName1']
    tokens: {
        "mainnet": {  "eth": {
        "chains": [
          "chainName1" // list of chains where ETH transfer will be available
        ]
      }}
    }
})
With this setup you will have ETH as a pre-selected asset, Mainnet as From network and chainName1 as To network. To switch transfer direction just reorder chains: ['chainName1', 'mainnet'].
Autowrap for tokens
To wrap tokens before transfer (for example to wrap ETHC before transfer to other chain) you need to specify token wrapped token info (address):
const TRANSFER_PARAMS = {
    amount: '1000',
    chains: ['chainName1', 'chainName2'],
    tokens: {
        'chainName1': {
            'erc20': {
                '_WRETH_0x123': { // wrapper token
                    'address': '0x0123', // wrapper token address
                    'name': 'wreth', // wrapper token display name
                    'symbol': 'WRETH', // wrapper token symbol
                    'wraps': { // token that needs to be wrapped
                        'address': '0xD2Aaa00700000000000000000000000000000000', // unwrapped token address
                        'symbol': 'ethc', // unwrapped token symbol
                        'iconUrl': '' // optional, icon URL for the origin token
                    }
                }
            }
        }
    }
}
metaport.transfer(TRANSFER_PARAMS);
You can use the same approach for updateParams and or during Metaport init.
Type definitions
You can import interface definitions for the Metaport config and other data structures:
import { interfaces } from '@skalenetwork/metaport';

const theme: interfaces.MetaportTheme = {
    primary: '#00d4ff',
    background: '#0a2540',
    mode: 'dark'
}

const config: interfaces.MetaportConfig = {
    skaleNetwork: 'staging',
    theme: theme
}